
Live Clerking Panel Guide
The Live Clerking Panel is designed to allow auction companies to clerk a sale for live bidders in live-only and simulcast events so they can more efficiently invoice and settle their sales all in the BidWrangler Auction Management platform. Think of this as your "Virtual Paper Clerk" for recording the high bid and winning bidder on all items, catalogued or created on-the-fly! This can be used for live-only sales or alongside a separate Online Clerking Panel operator in a Simulcast Sale.
This guide will walk through the features of the panel as well as offer instruction on the use of this tool.
Important: The Live Registrations check-in screen is required if you will be invoicing in our system. Please reach out to helpdesk@bidwrangler.com to schedule a training on both screens no less than 2 weeks prior to using these tools in a live sale.
Accessing the Live Clerking Panel
First, lets take a look at the panel and how to access it.
In order to open the panel, you will want to navigate to your bidding platform and log in with your admin credentials. Once logged in, click "View Auction" on the sale you are going to clerk. Once in the sale, click the 3 line menu in the top right and select "Live Clerking Panel".
Overview of the Live Clerking Panel
The Live Clerking Panel is broken into 4 main sections, covered below:
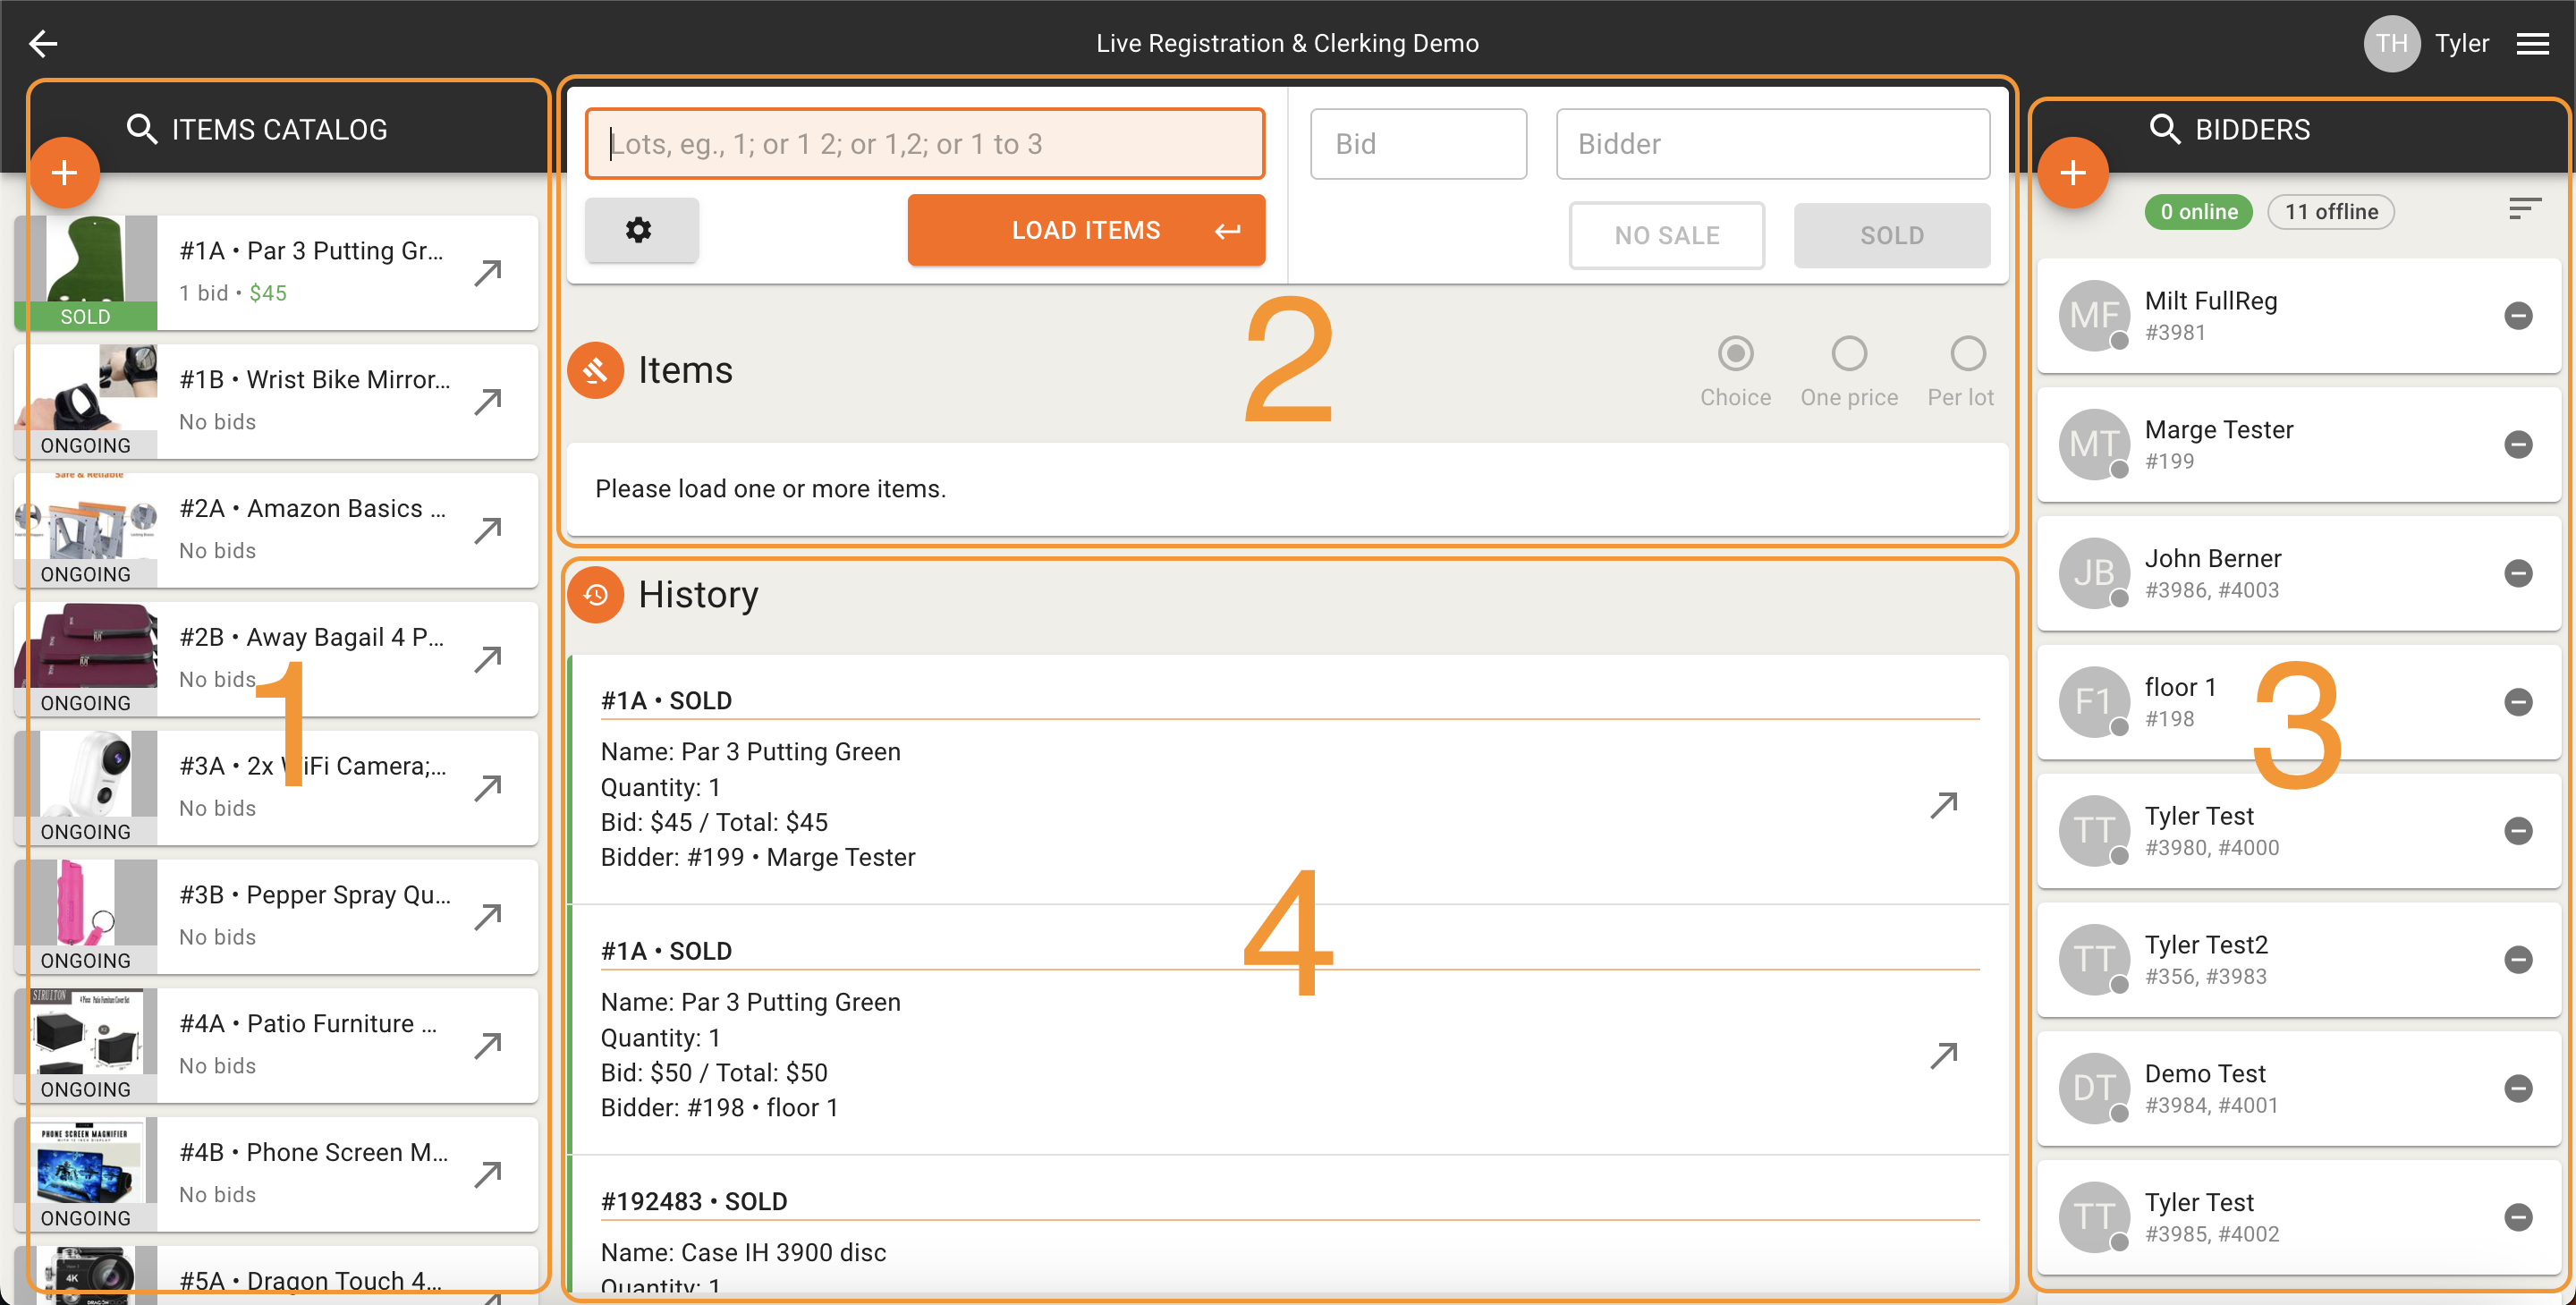
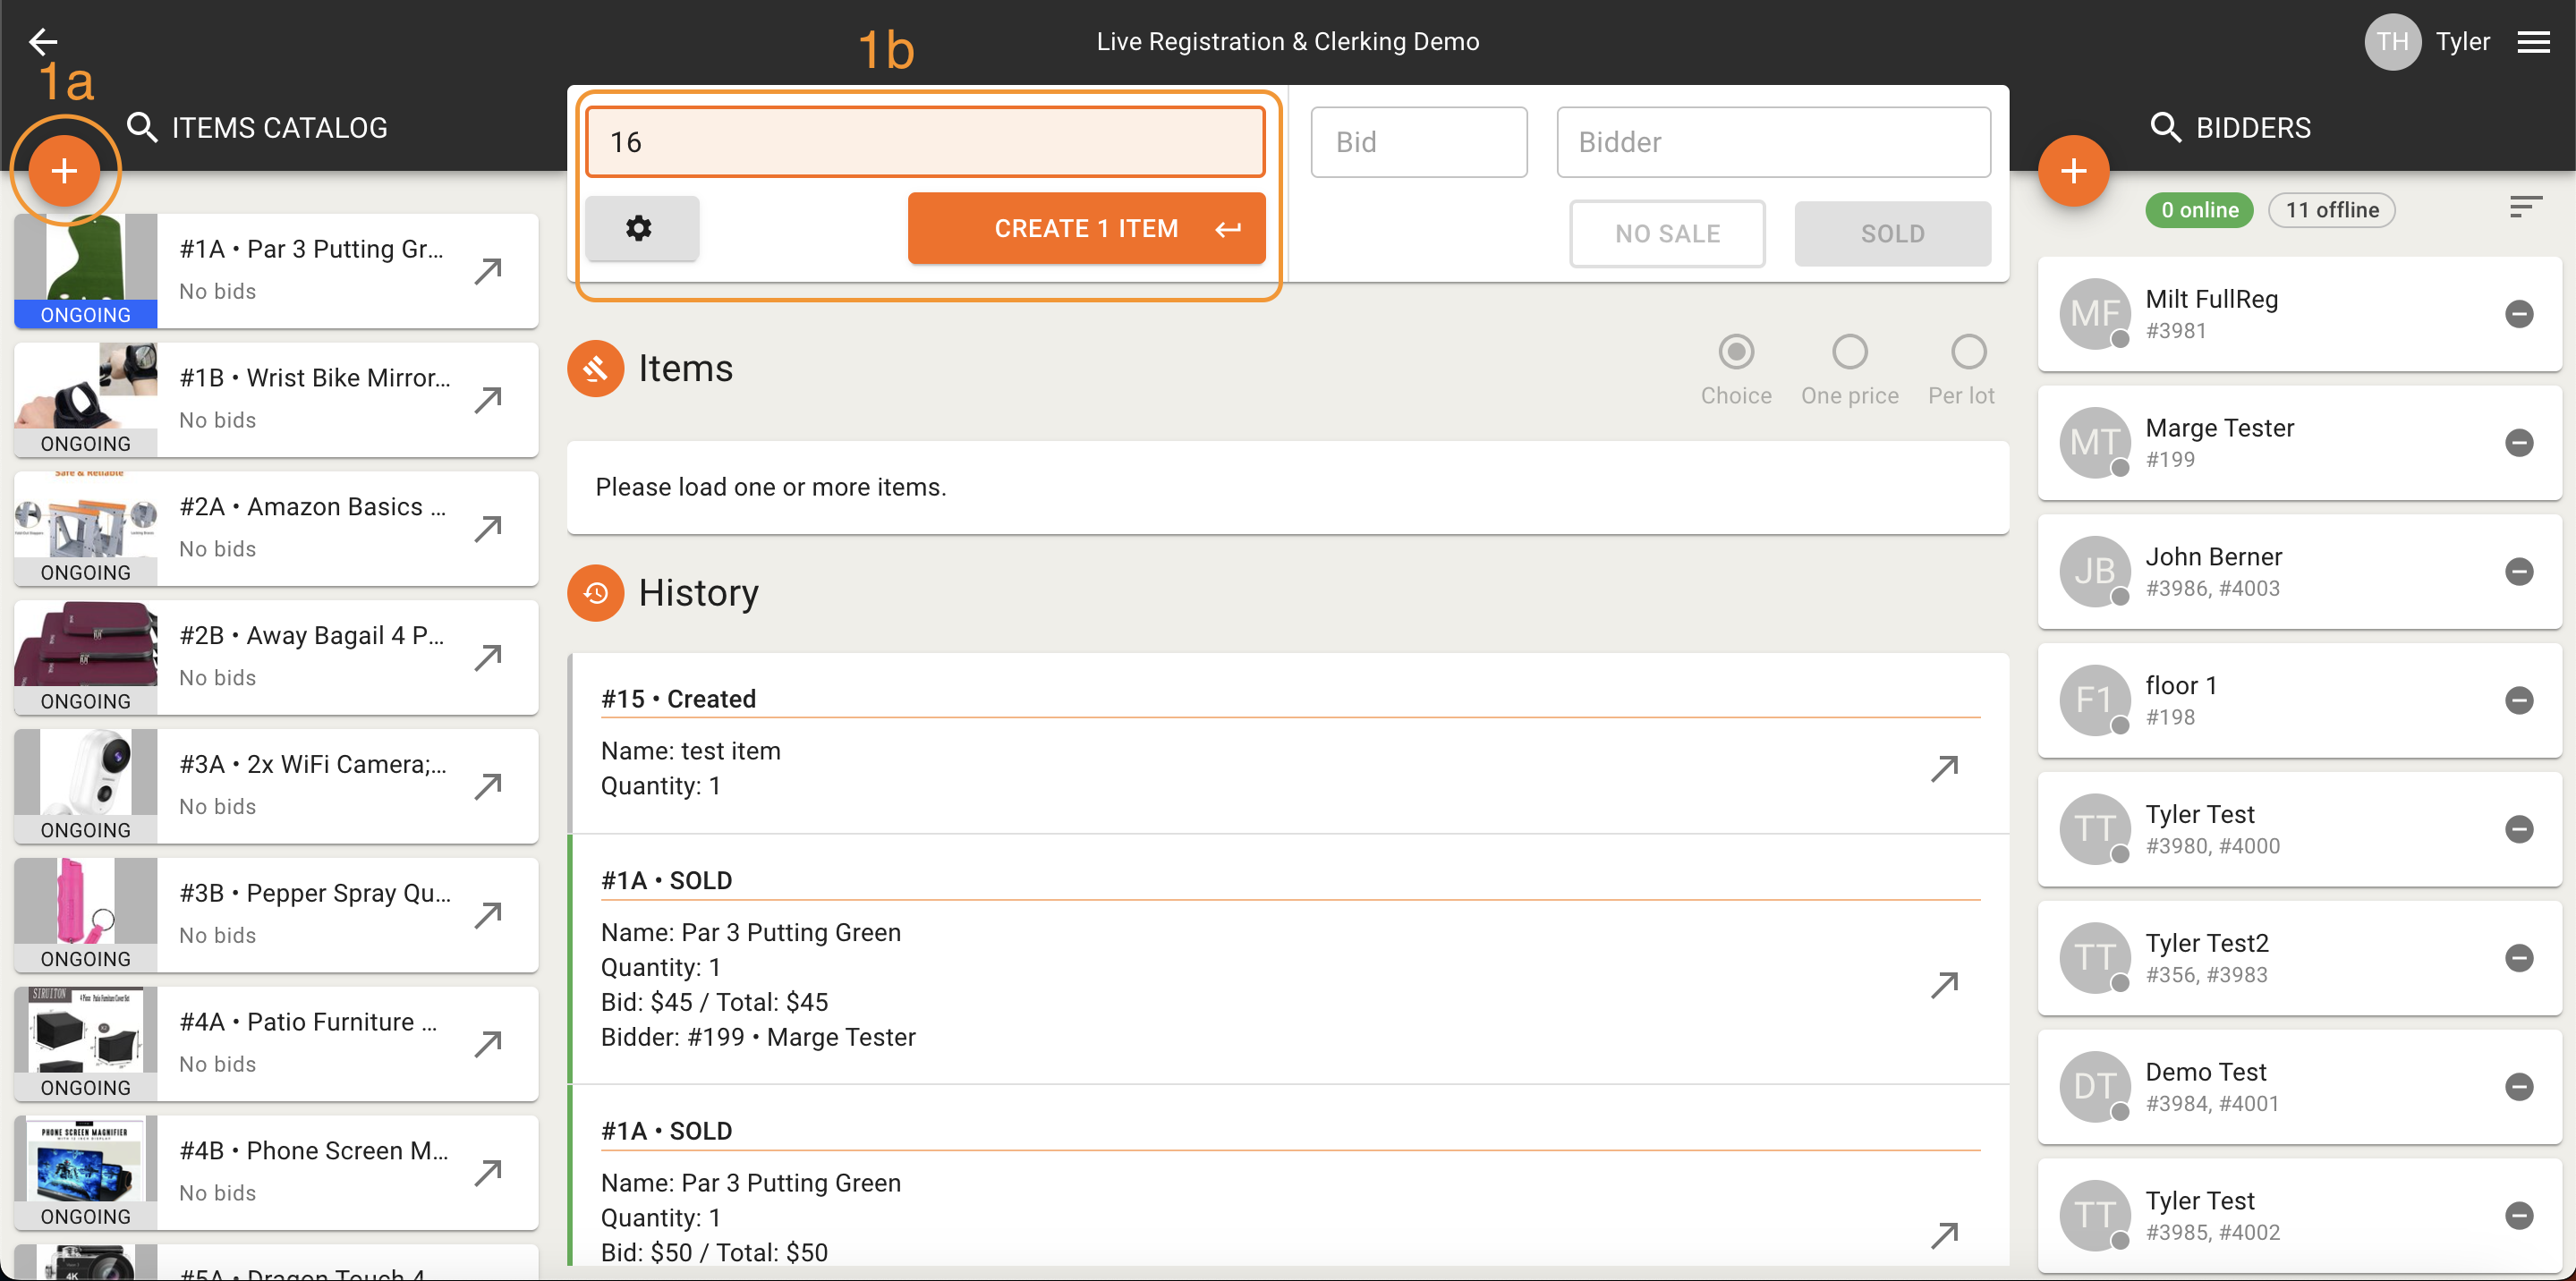
Section 1: Item Catalog
The Item Catalog Section is used to view and load the cataloged items in your auction. It is fully searchable using the bar at the top of the list.
Items can also be created from the catalog by clicking the + next to the search bar. The information available here shows the amount of clerked bids and the sale price if the item has been sold, as well as the sold status.
The arrow next to each item is used to load the item into Section 2 where the high bid and winning paddle number can be entered.
Section 2: Clerking Operations
The Clerking Operations Section is the most important portion of the Live Clerking Panel and is where you will spend the majority of your time. This is where items are loaded and/or created so the high bid and winning bidder's paddle number can be assigned.
All of the functions in this section will be further expanded upon below.
Section 3: Registered Bidder List
This section displays the list of your registered bidders. It provides a total count of your registrations and provides insight into whether they're online or offline. Their status is indicated by the green/grey dot in the bottom right of the initial dot.
You can search this list of registrations by using the search area at the top of the list.
Clicking any of the bidder cards will expand the bidder's information to show additional registration info.
Registrations can be added from the Live Clerking Panel by clicking the + at the top of the bidder list. You can search previous users and register them quickly or create a new bidder on the fly.
Section 4: Clerking History
The Clerking History Section provides an overview of actions taken in the Live Clerking Panel. Any item clerked is displayed here with information regarding the status of that item. It shows Lot ID, Name, Quantity, Winning Bid, Total bid (if there is a quantity more than 1), and Winning Bidder.
The arrow in the right side of these items is used to reload the item if a change needs to be made to that item. Once reloaded, the item can be re-clerked to change the sale amount or winning bidder.
This overview should help you navigate the Live Clerking Panel. Next, we will go over some specific functionality regarding the operation of the panel.
How to use the Live Clerking Panel
Important: To sell an item to a bidder {live or online} and generate an invoice, the recorded paddle number must be associated with a registered bidder in that sale. The Live Registrations check-in screen is required if you will be invoicing in our system. Please reach out to helpdesk@bidwrangler.com for training on both screens no less than 2 weeks prior to using these tools in a live sale.
Available settings:
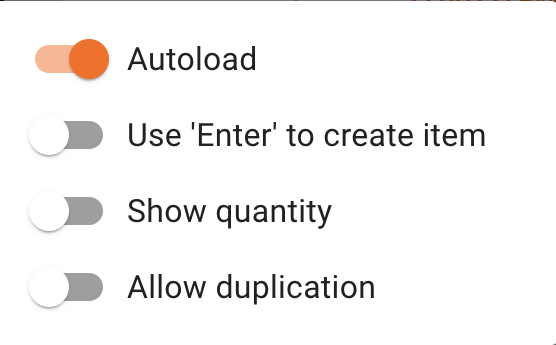
To view the available settings, click the gear icon below the Load/Create Item Field:

Autoload: This is the only setting that is on by default. When enabled and you are clerking cataloged items, the next item will load automatically upon completion of the previous item. This should be enabled for most simulcast catalogued sales where the sale order is predetermined and will not change.
Use 'Enter' to create item: This setting is helpful for on-the-fly clerking of sales. Instead of using a lot number not in the sale yet to create a lot, the Enter key will allow an item to be created.
Show quantity: This setting will allow for a quantity field to be present to the right of the winning bidder field.
Allow duplication: This setting will allow for item duplication. The button for this will appear in the History section.
How to Clerk a Cataloged Item:
To clerk a cataloged item using the Live Clerking Panel, please follow the steps below:
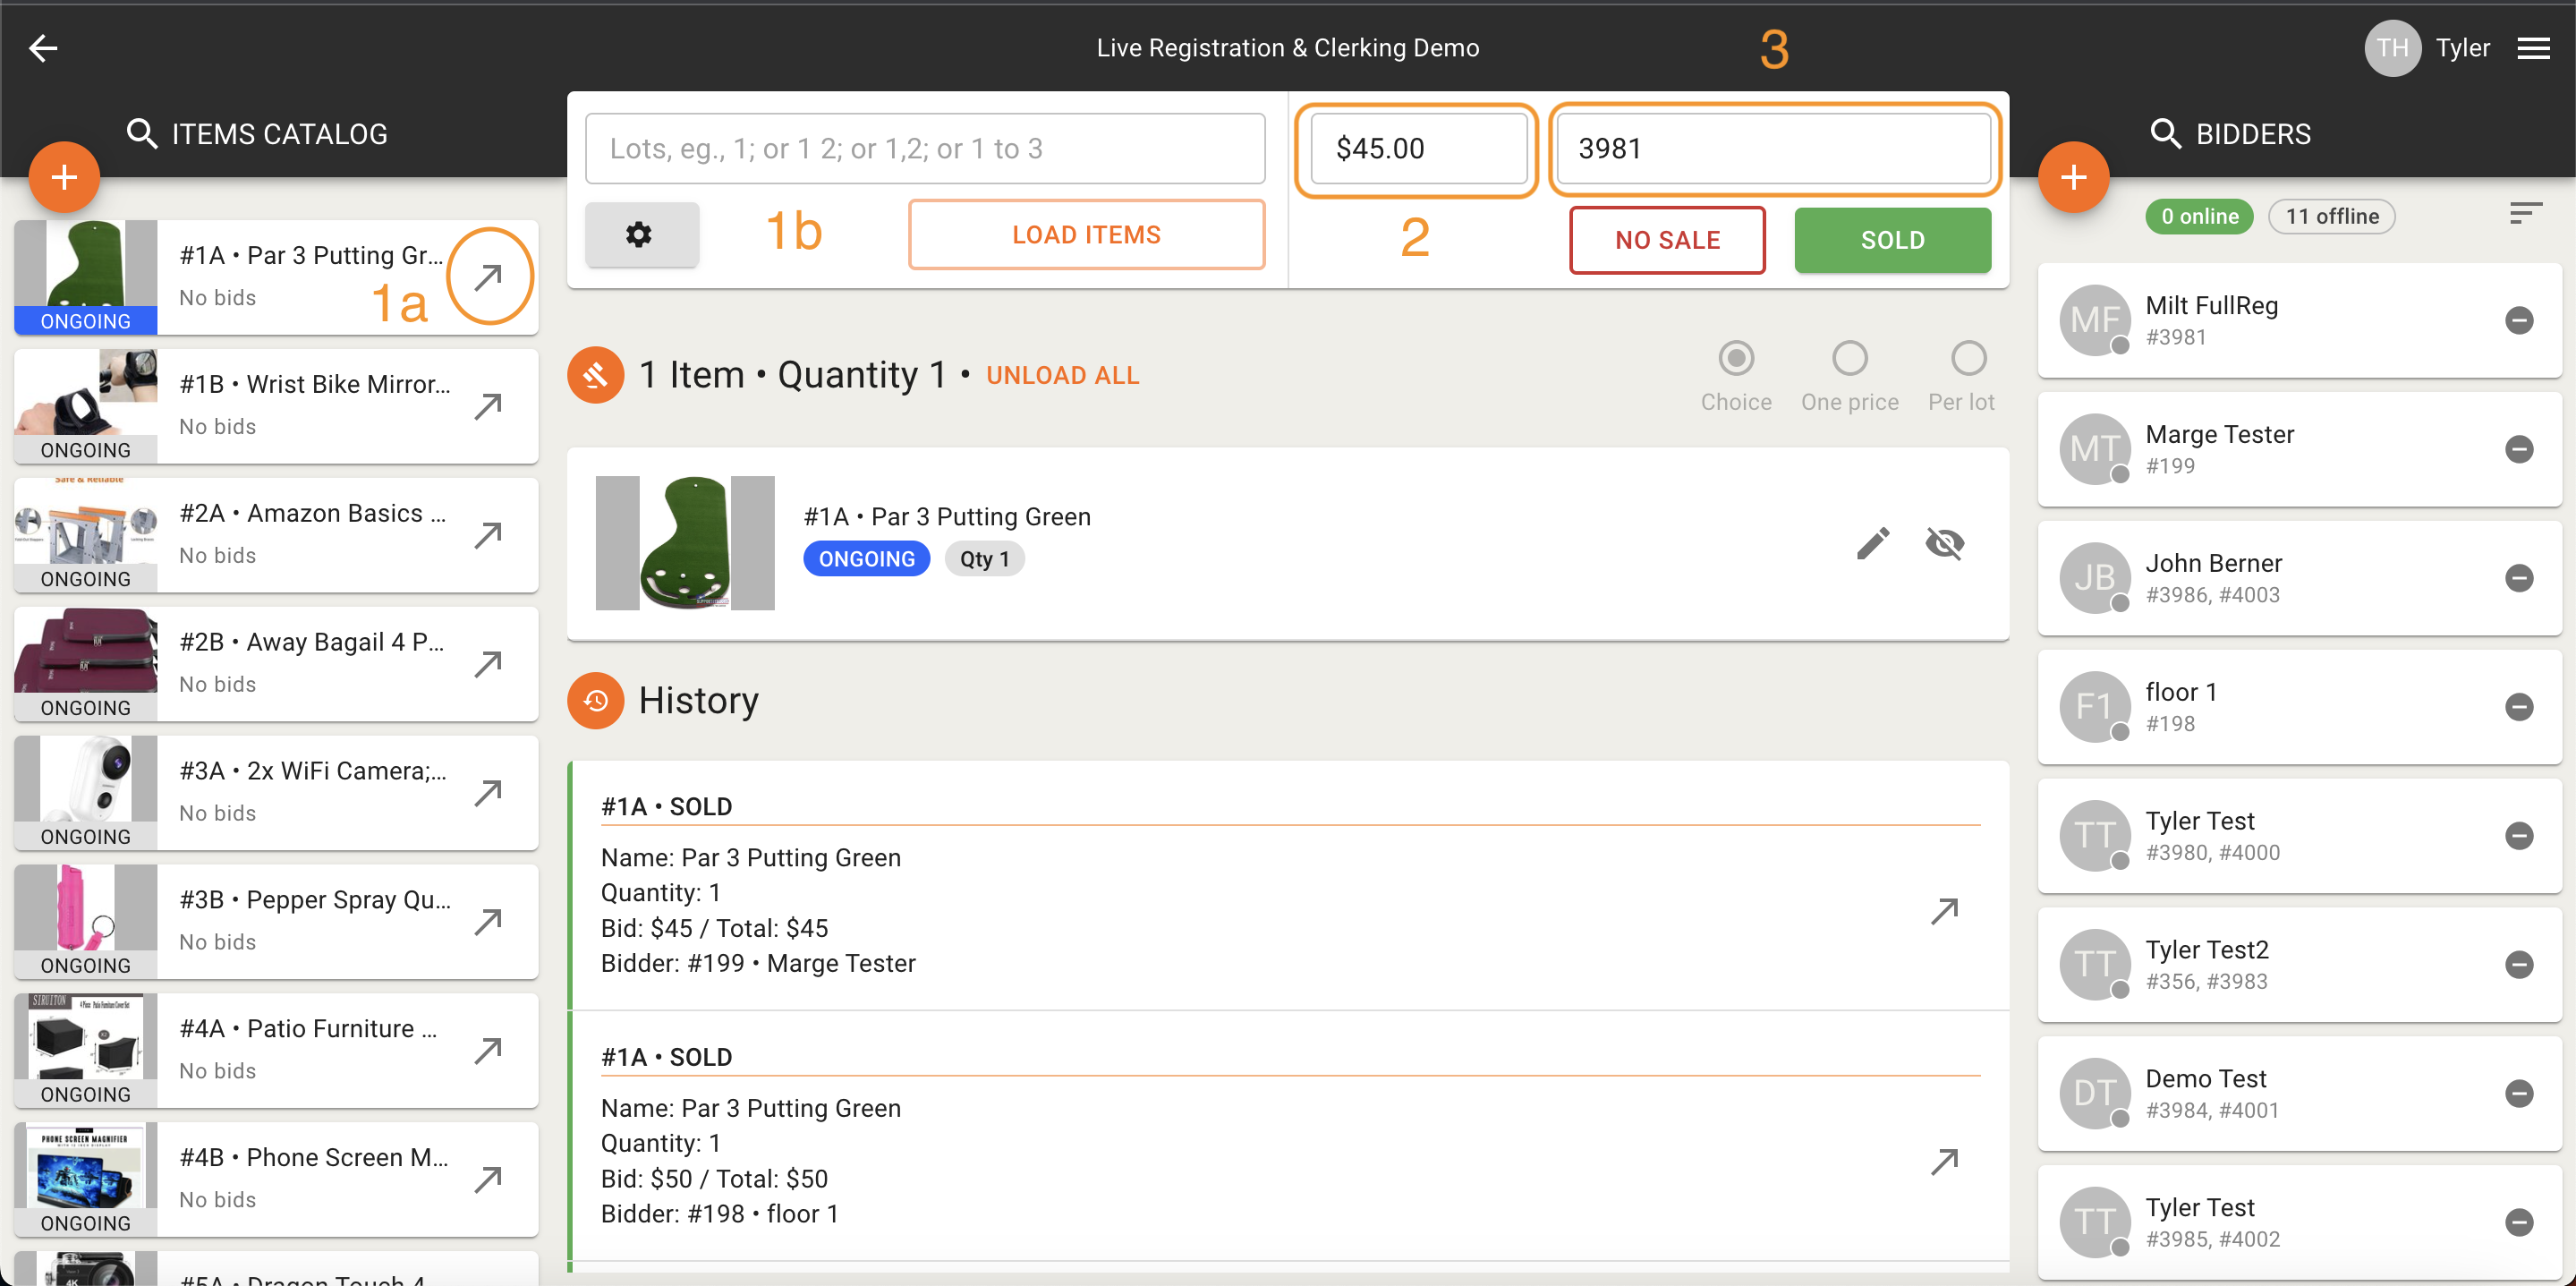
Load the item (1a or 1b)
Items can be loaded by typing their lot number or created by typing a new lot number into the text bar in the top right {"Lots, e.g. 1..."} . Loading an item will pull a cataloged item into the Item section at the bottom. Creating a new item for on the fly clerking will open the item creation screen and allow you to add information to your new item before clerking it.
Wait for the item to sell, then enter the high bid and winning bidder's paddle number (2)
Once the item you'd like to manage has been either loaded or created. It will appear in the Items section and is ready to be clerked. This section is designed so that your hands never have to leave the keyboard via Tab and Enter keys. Once an item is loaded/created, your cursor should automatically be on the bid entry box next. Enter the sold price of the item, hit Tab, enter the paddle number of the winning live bidder, then hit Enter. That item is now clerked and will move to the History Section.
Tip: If it is a Simulcast sale with online bidders and the item is sold to an online bidder, instead of re-entering any information, the loaded item should update from "Accepting Bids" to "Sold - $ - Bidder name (Online paddle number)." Click on this to auto-fill the high bid and bidder fields, then hit Sold or Enter to re-enter the same information and move on to the next lot.
If "Auto-load" is enabled, the next catalogued item will load. If not, manually load the next item. (1a)
TIP #1: If a mistake is made while recording the sale information, all you need to do is reload the item by clicking the arrow next to it in the History section and refilling out the bid and winning bidder fields.
TIP #2: If you'd like to edit information on any item, this can be done simply once the item is loaded. Just click the pencil icon to open the item details page and change the information you'd like. Click save and the item will update across the platform. This can also be done with items created on the fly.
How to Clerk an Item On-The-Fly with Item Creation:
To create an item from the Live Clerking Panel and clerk it on the fly, please follow these steps:
Instead of loading an item, either click the + at the top of the catalog section (1a) or type a new lot number into the Load/Creation field (1b). This will open the item creation screen shown below.
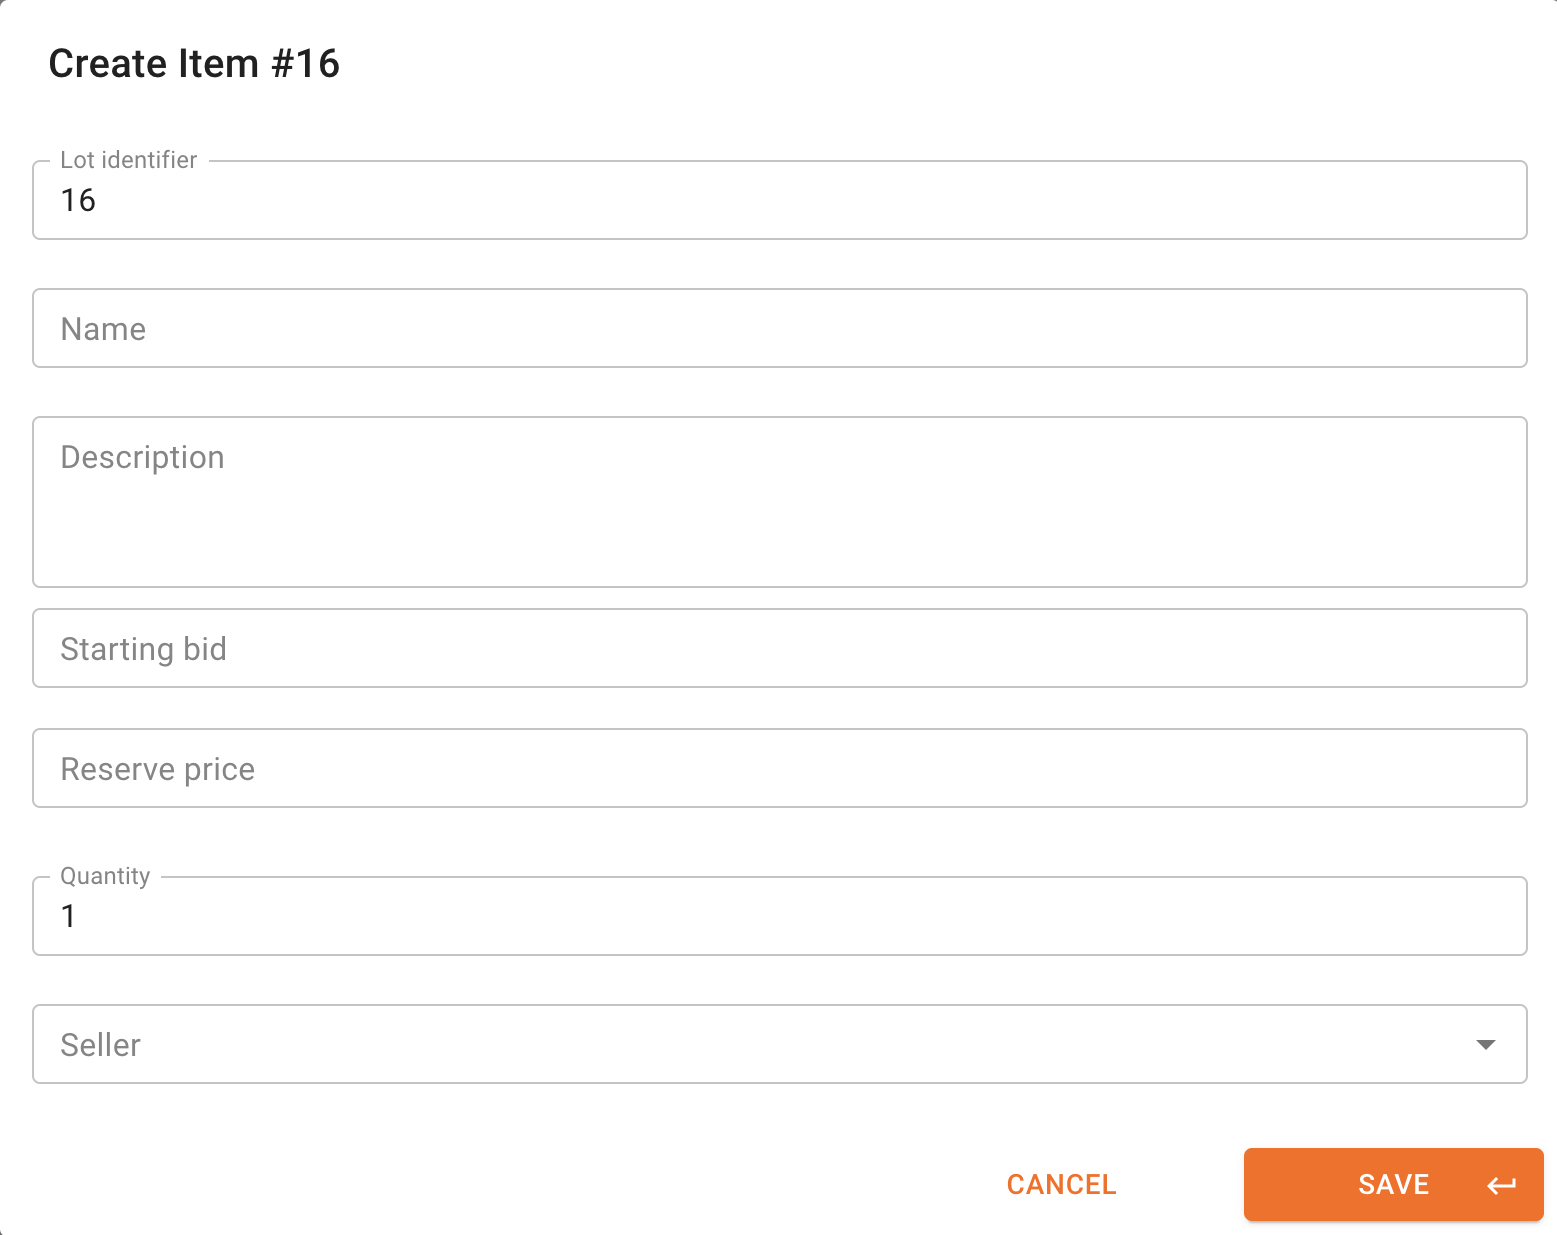
Fill out all pertinent information for the on the fly created lot. The only required field is Name. Once complete, click save or hit enter.
Once the item is created, clerk it the same way as a cataloged item by filling in the bid amount and winning bidder. Click save or hit enter on your keyboard to sell the item.
Available settings:
To view the available settings, click the gear icon below the Load/Create Item Field.
Autoload: This is the only setting that is on by default. When enabled and you are clerking cataloged items, the next item will load automatically upon completion of the previous item.
Use 'Enter' to create item: This setting is helpful for fully on the fly clerking of sales. It will automatically assign the next available lot number when you hit enter in the Load/Create item field.
Show quantity: This setting will allow for a quantity field to be present to the right of the winning bidder field.
Allow duplication: This setting will allow for item duplication. The button for this will appear in the History section.
If you have any questions about the operation of the Live Clerking Panel, the Registration Screen, or how to use these tools in a Simulcast event, please reach out to our Support Team at helpdesk@bidwrangler.com or (844) 296-8727 ext. 2